Quilting Hot Tip: Strip Piecing Quilts

I consider quilting to be a liberating activity that allows me to express my artistic qualities but concede that it can also be incredibly time consuming. What is a great shortcut that can cut that time in half yet produce an excellent piece that can be greatly enjoyed by all? Strip piecing, of course. The process is incredibly quick and easy but the finished work will have designs that are fresh and eye-catching. Strip piecing also eliminates the headache of working with small pieces of fabric and rather focuses on utilizing big pieces to create unique patterns. Let’s find out more about strip piecing quilts and how you can create your next quilt with this method.

Strip piecing quilts
Strip piecing is easy yet efficient!

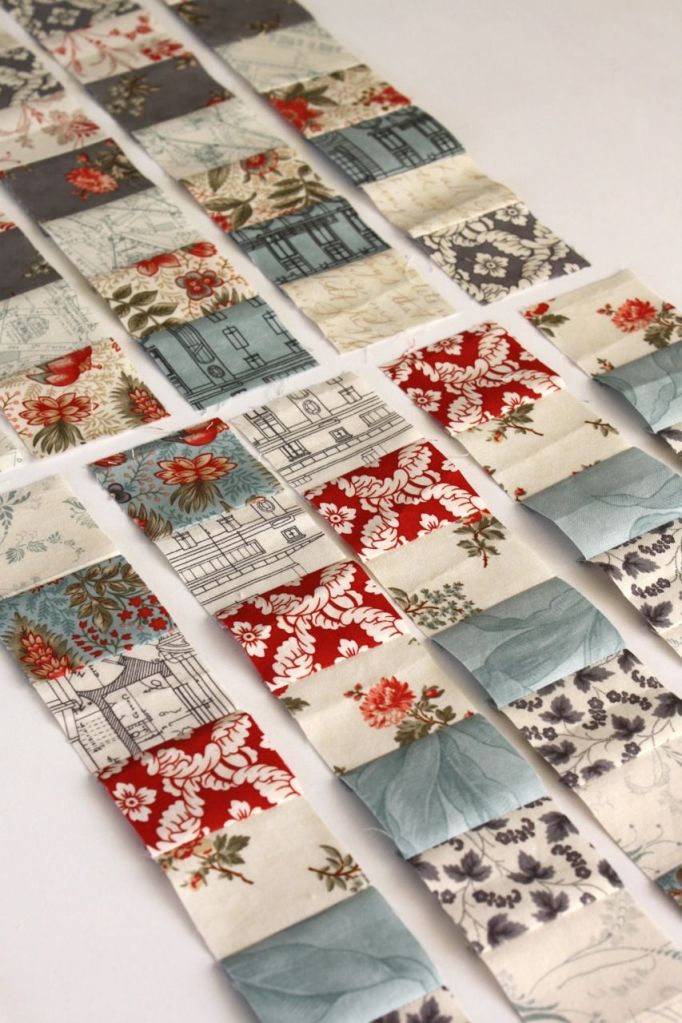
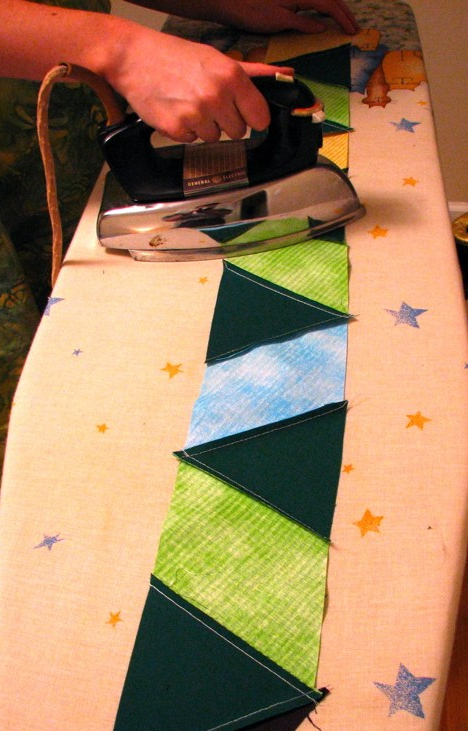
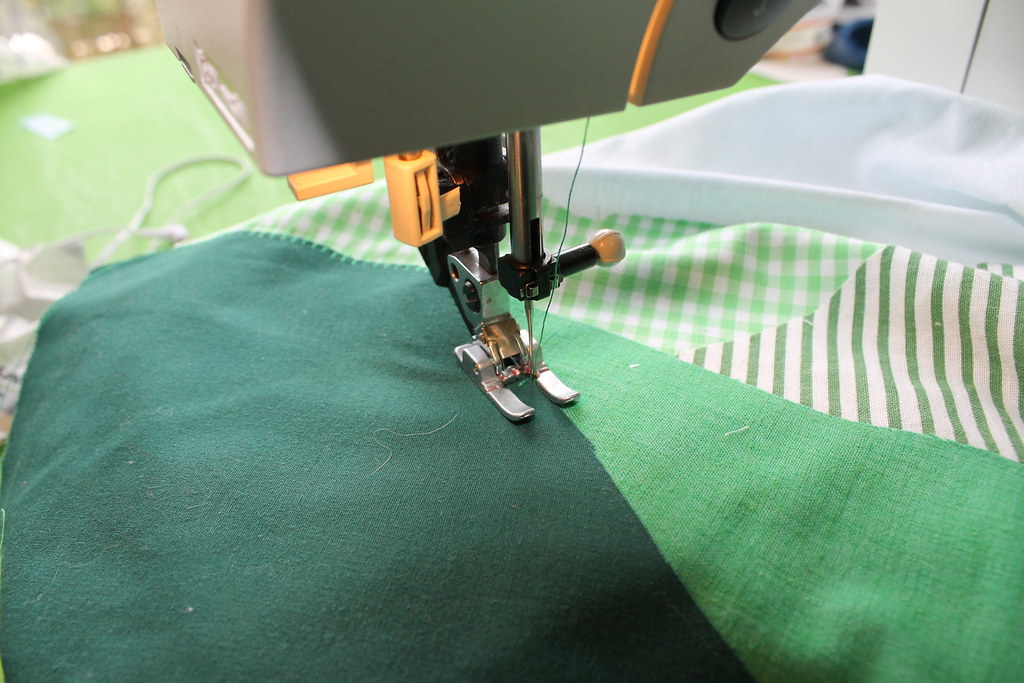
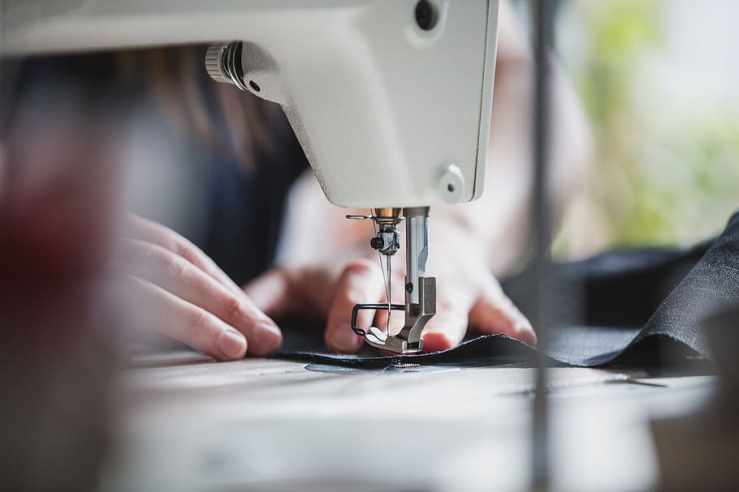
Strip piecing is a technique that is done by sewing together several fabrics together, cutting them into bite-size pieces, or ‘sets’, placing these sets together in different patterns to create quilt blocks, and combining the quilt blocks to produce a quilt. It sounds easy enough, doesn’t it? It is a great project to start with for many beginning quilters and often times yields fantastic looking quilts. Some quilters may run into issues such as distortions and wrong-sizing of the sets during strip piecing which are very common. Always remember to plan well and measure correctly when you are strip piecing as you are working with sets which are produced through sewing of several fabrics. The seams may eat up more inches that you may have anticipated or the pressing was not adequate enough, both of which would result in smaller sized sets and eventually distortion of the quilt blocks.

I like to follow the mantra, KISS – keep it simple stupid. Quilting can be arduous but there are many shortcuts that can be taken to lighten the load of the labor. Strip piecing is definitely one of my favorite techniques and should be utilized when you are looking for a quick and easy way to produce a quilt!

Getting Started: Prewashing Fabric

Prewashing the fabric before quilting? Is that really necessary? While it may seem like a hassle, prewashing is crucial in order to ensure that your project does not end up five inches too small. It is a preparation process which readies the fabric for the quilting ahead and eliminates the chance of potential shrinkage, hem or seam puckering, and color bleeding when the finished garment is washed. Furthermore, prewashing the fabric can help get rid of any chemicals that were used as finishing touches to the textile. Any non-synthetic fabrics, including but not limited to cotton, linen, denim, and silk, should be prewashed since shrinkage is typical with these fabrics. While synthetic fabrics are likely not to shrink, prewash these as well since they are prone to color bleeding. In summary, all fabrics should be prewashed before quilting to ensure the best quality of the finished project.

prewash and air dry!

The general rule of thumb is that the fabric should be prewashed in the manner you plan to wash the finished garment. For most cotton fabrics, it should be warm machine wash; silk should be handwashed in warm water or dry cleaned; linen, polyester, and rayon should be cool machine washes; and lycra should be cold machine wash. If you are handwashing, don’t take extra measures in the prewash but do it as you would wash normally. Once the prewash is done, air dry the fabric in the shade so the color does not fade. Machine drying is not recommended as this can further shrink the fabric; this exercise is not meant to shrink the fabric as much as possible but rather to prepare the fabric for future potential shrinkage. After the prewash, use the iron and press out any wrinkles or crumples you may see on the fabric and it should be as good as new.

Remember that this is a very important preparation step to ensure that the fabric is ready to be sewn. You may be met with a very unpleasant surprise if this step is skipped and the finished product comes out of the drying machine half its size, so make sure to prewash!

Getting Started: Easy Quilt Block Designs

So far we have gathered our starting materials and explored some basic concepts such as choosing and cutting the fabric. Now, let’s get our hands dirty and get down to business. Quilt blocks are the essential basic structures of the quilt; they are the bones to the body and the pillars to the building. These quilt blocks are formed by combination of quilt units, which can be fabric pieces or even pieces sewn together. There are infinite possibilities in bringing together a quilt block but it is best to begin with easy shapes when first starting out. The most important part of designing and building a quilt block is planning. Make sure to determine what the size of the quilt is, how big each quilt block should be, and narrow it all the way down to how big a quilt unit should be.

basic square quilt blocks

Let’s first determine the basic sizes of the units, blocks, and the quilt to assist you in the planning. We will assume each unit will be 3′ x 3′, each block will comprise four units with two on each side resulting in a size of 6′ x 6′, and the quilt will consist of 3 blocks horizontally and 4 blocks vertically. Now you get the idea. The easiest and the first project that every quilter should undertake is the basic square quilt block. Cut the fabric into 3 1/2′ x 3 1/2′ pieces – remember on the prior post about a breathing room for seam allowances – with each piece representing a unit and will be sewn two by two to create a quilt block. The size of the quilt block should be 6′ x 6′ when complete. Now you can get creative by using various color schemes and designs of each unit but make sure to start off simple and easy. Designing fancy quilt blocks will eventually come but it is crucial to get some experience under your belt before trying advanced designs.

Don’t worry if you think we are moving too slow and don’t overexert yourself! I had a difficult time getting the basic square quilt block together because the level of detail is so important in quilting. Make sure to keep working with the squares and next week we will try the triangles!

Quilting Hot Tip: Nesting Seams

Details matter especially when it comes to quilting. In relation to the prior post on pressing seams, let’s cover nesting seams and how a minor detail can improve a project by a mile. As previously covered, pressing seams will settle the seam allowances and assist in producing beautiful quilt blocks that are accurate to measure. But when two seams meet perpendicularly, there can still be bulk that can still distort the quilt blocks even after pressing. This is where the concept of nesting seams can further reduce bulk and provide that 1% that will go a long way optically.

quilt blocks lining up beautifully!

So what is nesting seams and how do you do it? To nest seams, press the seams in separate directions at the intersection point to maximize in reducing the amount of bulk in the cluster. If you are working on two seams that are intersecting to create a square block, nesting seams is how they will line up perfectly. In such scenario, the most ideal method to nest the seams is to press the seams in either a clockwise or counter-clockwise direction and then open up press the seams down. Nesting seams is not a difficult process but does take some planning ahead so that each seam is lined up opposite of each other.

These are the hot tips that only take minimal planning but can go a long way in making your quilt look the best. Many experienced quilters will admit that they had issues with getting seams lined up properly before they learned how to nest the seams. Check back next week for additional hot tips to help you in your quilting life!

Quilting Basics: Pressing Quilt Blocks

Pressing quilt blocks is one of the finer skills to learn during your quilting journey and it will make your project look infinitely better. Unbeknownst to many, slivers of quilt blocks are lost within seam allowances when sewn together and can create unseemly pockets. This will also have an impact on the size of the quilt overall as bits of fabric that are lost in the allowances adds up to make a difference. By pressing the quilt blocks at the seam allowances, it will settle the seam and eliminate those pockets thereby producing quilt blocks that look fantastic and are accurate to your measure.

myquiltlife pressing seams
let’s press these seams to make them look nice!

The key to mastering pressing quilt blocks is to allow the heat and the weight of the iron to do all the work. Don’t move the iron forcefully as that could further stretch the seams, but rather gently glide it down the seam. Bring up the heat of the iron to the “cotton” setting and use the edge of the iron to glide up and down the seam to press it flat. Remember to turn the quilt blocks over and press the seam from the back as well. There are few out there who steam-press as that can contribute to a more crisply pressed seams. I typically employ a spritzer bottle to spray every once in a while for additional moisture but noticed that steam pressing can lead to dampened quilts that may worsen the seams by stretching.

Be careful at all times and as always, constant monitoring of progress is key! Pressing is one of the easiest and most efficient ways to beautify your quilt project, so invest time and effort in this.

Can I Use My Regular Sewing Machine for Quilting?

After reading the prior post on whether or not you should hand or machine quilt, you have chosen to begin with machine quilting. You perform a Google search to see how much a quilting machine would cost and… yowza! Surely these are incredible machines with so many options and pretty designs but… won’t the sewing machine in the closet do the job just as well as these quilting machines? Yes… and no. The quilting machines are specifically designed for quilters and much more suitable and convenient to use. But there are ways for you to utilize your existing sewing machine to begin your quilting life prior to splashing additional cash for a proper quilting machine. Let’s dig into details on how to use your sewing machine as a makeshift quilting machine.

Quilting Machine
Are quilting machines necessary?

Essentially, there are two methods of quilting that can be easily accommodated on a sewing machine: straight line quilting and free motion quilting. To perform straight line quilting on your sewing machine, replace the regular presser foot with a walking foot. The walking foot grips the top of the quilt in conjunction with the feed dogs that grip bottom of the quilt. This will feed the quilt set into the sewing machine at a consistent and even pace and result in a beautiful quilt that is not distorted and in sync throughout.

For free motion quilting, lower the sewing machine’s feed dogs and replace the regular presser foot with a darning foot. The feed dogs, as detailed above, help guide the fabric into the sewing machine. Without them, the quilter will have complete control over how the quilt moves. The darning foot will keep the fabric from coming up as you move it around to your liking. These actions are solely designed to ensure you have all the control over how the quilt moves as you sew. One quick comment on free motion quilting – since you now have full control on how the quilt moves, make sure you practice as any movement can have an impact on how your project turns out.

Now these days, many companies have introduced new models that are more appealing to quilters given the rise in demand. However, remember that your old sewing machine is still effective in basic quilting with minimal changes made. The sewing machine is a strong, study object that can withstand the test of time as long as it is well taken care of. One of the best sources out there on how to take care of or repair your sewing machine is Dr. Sewing Machine, who regularly posts articles on sewing machine how-to guides. So dust up that old sewing machine and begin your quilting life!

Hand Quilting or Machine Quilting?

In one of my earlier posts, I pointed out that sewing machine should be a part of the tool set as you begin your quilting journey. Inevitably, questions started to flow into my inbox regarding whether or not sewing machines are truly required. After all, if you plan to hand quilt all the time, won’t the sewing machine just gather dust on the side and money goes down the drain? In this post, I will go into detail on hand quilting and machine quilting processes and explain why I believe familiarizing yourself with both methods is the best way to fulfill the real potential of your quilting experience.

Man using sewing machine
Hand Quilting or Machine Quilting? Decision is yours.

Hand quilting has been and continues to be enjoyed wildly by quilters as many feel it provides freedom to express feelings and artistic qualities. It gives a much more personal feel to the project and the human quality is appreciated and admired by many. In addition, hand quilting is able to be performed anywhere and anytime without the need for expensive equipment. Imagine old ladies sitting on their rocking chairs hand quilting and you will understand the simplicity and the easy access.

Machine quilting, on the other hand, is much faster and easier when done properly. It will save you a lot of time compared to hand quilting and the sewing machine performs most of the hard work for you. And obviously, machine quilting comes out cleaner than hand quilting which is preferred for many out there. In addition, machine quilted are more durable and is much easier if you choose to manufacture a quilt with different types of fabrics. Machine sewn stitches are more consistent, stronger, and tighter and can withstand greater stress than hand sewn stitches. Machine quilting is highly recommended if the planned project is anticipated to be washed and cleaned on a regular basis.

The decision to hand quilt or machine quilt is personal and you really can’t go wrong with either method. Each has its own pros and cons, but I highly recommend you to learn how to quilt both ways and pick and choose based on the circumstances. Each project serves different purposes and it is best to quilt accordingly based on the anticipated usage to ensure your quilt lasts a long time.

Quilting Basics: Choosing a Fabric

Now that you have gathered the necessary tools to start quilting and learned how to properly cut the fabric, what’s next? We need to utilize those skills to make an awesome quilt block! Before going through with the motions, we need to choose the proper fabric to establish the foundation for your masterpiece. Let’s read on to discuss the different types of fabric and materials to help you in deciding what to use for each project style.

Make sure to plan out your big picture prior to purchasing your fabrics. Many are caught off-guard when they buy fabrics without a solid plan in place and realize that the fabrics have different appeal when cut in different shapes and sizes. In addition, don’t forget to buy more fabric than you plan for! As a beginning quilter, you will absolutely make mistakes and having extra fabric will come in handy during moments of frustration.

fabric extravaganza!

The fabric material is one of the key considerations to decide as you determine your project. Most quilts you see are 100% cotton, or cotton-based mix, and these are the ideal types to work with as a beginner. Not only is cotton natural and allergy-free, ideal for exposure to the skin, but it is such a joy to work with when you quilt! You can also decide to go with synthetic fabrics, which include materials such as rayon or polyester, which bring more flair and color to your quilt. But as aforementioned, it is recommended to start with cotton or cotton mixes and gradually work your way up to synthetics as they can be more difficult to work with given their texture and sensitivity.

Lastly, have a clear understanding of how color tones will look on the quilt before assembling shapes with different colors. Colors speak volume to your audience therefore it is paramount that the colors you put together project the tone you want to deliver. Warmer colors will appear to be closer to you and convey activity and alertness whereas cooler colors will appear to be further away from you and transmit calmness and soothing sensations.

Quilting Basics: Cutting the Fabric

Some of you out there may think that this topic is overkill of basics, even for those who are just starting out quilting. I think it is paramount that every important skill needed for quilting be covered for a solid foundation. Fabrics are the bones of the quilt and represent the basic structure of your project. If the fabric is off by even the tiniest of the margins, it will hinder your construction and you will wish that someone had given proper tips on how to cut the fabric. So, without further ado, let’s go over the procedures on how to cut the fabric correctly and nicely.

Before getting started with the cutting, I recommend using an iron to smooth out the creases in the fabric. This will decrease your fabric cutting time and frustration by half, guaranteed. Prepare all the tools necessary for this exercise, including the cutting mat, the rotary cutter, and the fabric. I also highly recommend wearing a glove for your non-cutting hand to avoid any accidents.

Determine the size of the fabric you want, and initially cut the fabric slightly larger than that size. Line up your fabric on the cutting mat utilizing the rulers and then cut off the selvage, or finished, edge on one end. Rotate the fabric 90 degrees, utilize the rulers again, and cut off the selvage edge. Rinse and repeat for the other two sides. Once all sides have been cut, run the fabric along the rulers again to make sure that the sizes are accurate and edges are straight. I cannot emphasize enough that even the tiniest of margins are so important in maintaining proper structure of your quilt. Precision is the name of the game.

Materials needed to start your Quilting Life (Pt.2)

Let’s continue our journey to find out what are the key materials needed to begin your quilting life. In the prior post, we covered the quilting fabric, rotary cutter, cutting mat, quilting ruler, and iron and the ironing mat. Whew, that is quite a list to cover! But that’s only half of the materials needed to get started on quilting- read below to find out the rest of the list!

Safety pins are a quilter’s best friend and it’s easy to see why. Pins will help in basting your quilt and proper technique will make a significant difference in quality of the project. I prefer the curved basting pins which are more versatile and adjustable.

Need ‘dem safety pins!

Just because you have a rotary cutter, don’t forget about the scissors! You will need scissors for certain quilting tasks and to use on non-fabric items such as paper or plastic. I usually keep two sets of scissors, one for fabric and one for non-fabric.

Who says that seam rippers are for newbies? These will make your life much easier not to mention your quilt much prettier. When choosing a seam ripper, make sure to find one with a head that is very sharp.

What is the use in getting that fine quilting fabric is your thread isn’t good enough to hold it? Don’t reach for anything polyester which can be too abrasive on the quilt, just go with your standard cotton threads.

I debated whether or not to put this under essentials, but I do highly recommend having a sewing machine to help in your quilting quest. You may plan to hand sew, but your hands will thank you if you decide to get a sewing machine. They are relatively affordable these days and the stitches will look much cleaner.

Next week, I will discuss basic skills required to begin your quilt journey. Stay tuned for exciting updates on MyQuiltLife!